Pages

Tuesday, June 18, 2013

Sketchpacker Tools for Beginners - PENCILS

After talking about materials to draw on in our last post on tools, here's a post about what to draw with. And the very first tool most of us are familiar with is the humble but mighty...

P E N C I L


Do not be fooled. This is not a child's toy. in the hands of a skilled artist, a pencil can produce an image as good as a photograph.


For Starters
As in the last post, I think it would be helpful to start out by suggesting a pencil that a beginner sketchpacker can easily get. Thankfully, good drawing pencils are easily obtainable, and there's a lot less to think about than, say, paper. Faber Castell and Staedtler produce a whole range of pencils with different shapes, lead hardness and lead size. But if you want a multi-purpose pencil to start off with, a 2B pencil would be a good balance of hardness and darkness (more of that later).

Commonly found pencils to start off with


H's, B's and Everything Else
Now you might be wondering what's with those B's and H's and stuff. Those letters indicate the grade of the lead in terms of darkness. "H" refers to "hardness" and "B" refers to "blackness". For leads other than H or B, you might find a number in front of the letter (such as 2B). The higher that number, the greater the hardness of blackness. 10H, therefore, would be a very hard lead and not so dark. 9B would be a very soft and black lead. Hard leads wear down slower and are more suitable for detailed work, while soft leads are darker, but wear down quickly and are more suited for broad strokes.
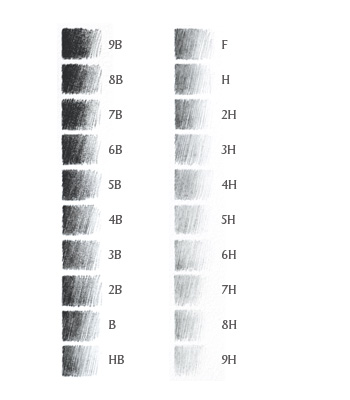

Pencil leads are a mixture of clay and graphite. Generally speaking, more clay and less graphite would result in a harder lead. But it should be noted that not all manufacturers follow the same recipe. I have found that Lyra's ArtDesign 669 2B is actually relatively harder (and lighter) than Faber Castell's Goldfaber 1221 2B. The best way to find out the differences is to experiment!


Not all pencils follow this grading system. Pencils like the Blackwing and Ebony pencils (in the photo above) don't have these numbers and letters on them. Ebony pencils, for example, are very soft and black and smooth with thick lead cores. Several manufacturers such as Sanford and Prismacolor make Ebony pencils. These pencils are not for fine detail work, but are great for laying tones in broad strokes.

Jurong Bird Park waterfall drawn with Ebony pencil

The Blackwing of today is also a very black and smooth pencil. Its history is quite interesting and it was a very well-known and famous pencil that was the tool of choice of famous animators like Chuck Jones. Today's version is a reproduction of the original using the a similar recipe. More on the Blackwing in the following links:
It's core is narrower than the Ebony pencils and is more suitable for finer work.

Anyway, I get ahead of myself.

If you're bringing wooden pencils around, be sure to bring a sharpener. You can do without an eraser, but unless you're planning to shave the pencil down with a penknife (which can be useful for stylistic purposes), you'll need to sharpen it when the lead has gone into the wood.


Clutch Pencils or Lead Holders

If you have a little more cash to spare, you might want to invest in a lead holder.

Rotring lead holder with lead

Many varieties exist for different lead types and sizes. The most common ones are those that use 2mm lead (similar to the lead cores found in most 2B pencils). Unlike mechanical pencils where you press the rear to advance the lead, pressing the button at the back of a lead holder opens up the clutch at the front so you can move the lead to the desired position/length.

Clutch pencil showing clutch head

Because you're using a length of graphite lead, you don't really need to sharpen it. However if you still wish to do so, you can get a sharpener for the size of lead you are using. Some lead holders have basic sharpeners in the rear button.

Rear sharpener. This one can be removed so the lead can be fed from the back

One of the conveniences of using a lead holder besides not having to sharpen the lead is that you can use different grades of lead in one holder. They tend to be a little heavier than wooden pencils, though, since they're made of metal and plastic.


This is just an intro to pencils. There are many other graphite products out there such as graphite sticks (think: pencils without wood), water-soluble graphite, even graphite powder. Each has its own properties and use.

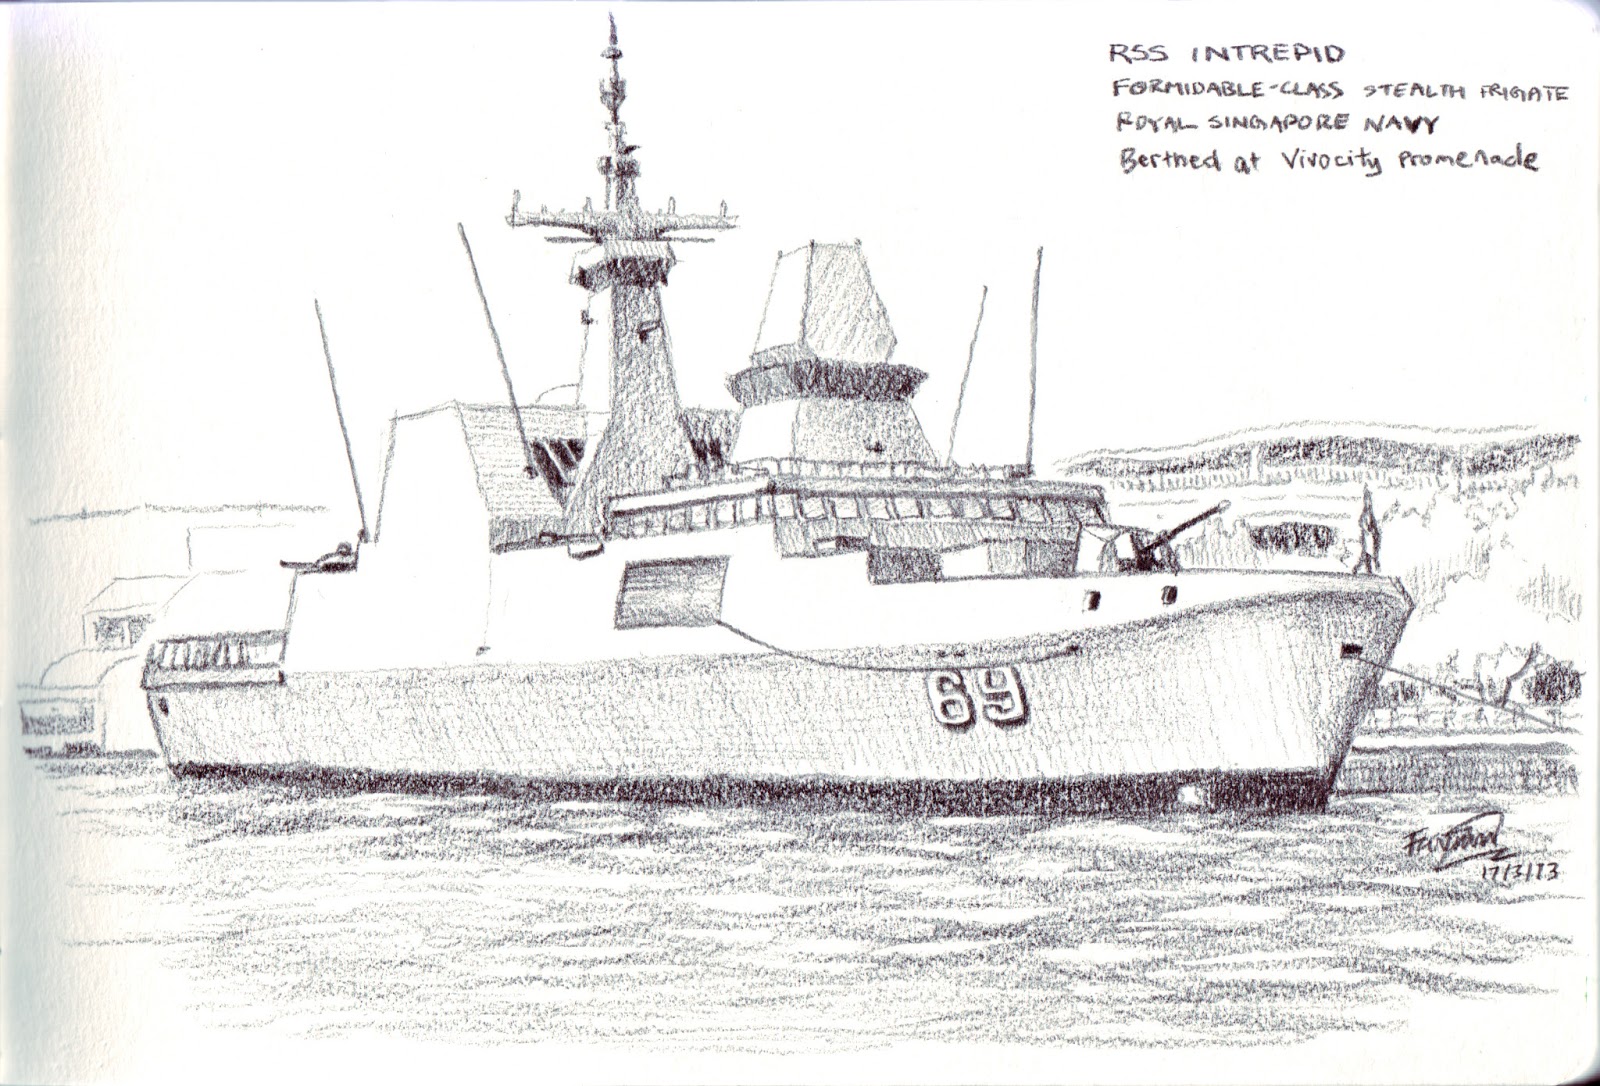
The pencil, though simple and seemingly primitive, is surprisingly versatile. It can afford you worlds of line variation and tonal values if you learn to wield it well. Below are some of my pencil sketches, but they are only a tiny sample of what you can achieve with this wonderful tool:

Copyright © Favian Ee  2013

Copyright © Favian Ee  2013

Copyright © Favian Ee  2013

Copyright © Favian Ee  2013

Copyright © Favian Ee  2013

Copyright © Favian Ee  2013

Copyright © Favian Ee  2013

Copyright © Favian Ee  2013

Copyright © Favian Ee  2013

I won't go into details about how to use the pencil in this post, but here are some books you might find helpful on pencil sketching:


Happy Sketching!!

Sunday, June 9, 2013

The 25 Least Visited Countries in the World

For those of you who are more adventurous, why not visit one of these countries? Gunnar Garfors lists 25 of the world's least-visited countries, tells us why so few tourists go there, and why someone might want to visit anyway.

http://www.afghanscene.com/may-2013-issue-may-2013-issue/10384-the-25-least-visited-countries-in-the-world

And don't forget your sketchbook and sketching tools!

Saturday, June 1, 2013

A Word on Mistakes

I guess one of the things that keeps a lot of us from even starting to sketch is the fear of making mistakes. Probably a lot of the time, those who say "I can't draw" actually mean "If I tried, I'm going to make a mess (i.e. make a lot of mistakes)". Of course, the reality is The Only People Who Can't Draw Are Those Who Never Try. After all, even a bad drawing is still a drawing. And everybody starts of - guess what? - bad. The sooner we realise this, the better, and the sooner you'll be enjoying doing bad drawings for nobody but yourself. In time, if you keep at it, you'll be proud to share your works - no matter how humble - with others who at one point in time thought the same way as you do now. And with others who can help you get even better.

So here's a little something to help you put aside those irrational fears and get you out of your comfort zone.


Mistakes Are Part of Sketching

Mistakes and accidents happen to even the best and most experienced of us. A stray line, wrong perspective, wrong details, ink spills, wrong proportions... the list goes on and on. It happens all the time, though maybe less if you've been practising a lot. It's just part and parcel of the nature of sketching. You don't have days or weeks to plan your composition, do your studies, lock your ideas down before taking your time to execute them to perfection. You're trying to finish a quick drawing within an hour or even a few minutes. Sooner or later, you're bound to make a mistake! In fact, you can count on it. 

Copyright Favian Ee 2013

Mistake: Stray brown brush stroke in the sky area
Solution: None. It was a staining colour so I couldn't get it off.
Just left it there and finished the piece.


Mistakes Are Part of Growing

Thank God for mistakes! Yes, you heard me right. As the old idiom goes, "Failure is the mother of success." If you don't make any mistakes, you never really learn. Mistakes are part of life. They're part of growing up. They're part and parcel of growth. Mistakes help you get better - unless, of course, you think you are doing just fine (in which case you don't need any encouragement to start sketching anyway). 

Copyright Favian Ee  Feb 2013

Mistake: Went over the sky too many times.
Lessons learned: 1) This paper dries too fast.
2) For large areas of flat watercolour, don't go back over it.
If you try and correct it, you might just end up ruining it.

Copyright Favian Ee  May 2013

Avoided the same mistake with the sky.
But made another mistake with the roof :P


Do Not Be Afraid

So grab your pencil and go out there and make mistakes. Make many of them! Make new ones! Learn from old ones. Get more experienced artists to critique your drawing. After all, what's the worst that could happen? Somebody says something nasty about your art? Well, at least you tried (did they?). And you were not drawing for that person's approval (you don't even have to show it to others in the first place if you don't want to). And there may be something to learn even from the nastiest critique. Just say thank you and go do another drawing. Make it better. A bruised ego never killed anyone, but it has made a lot of people better than they once were. 


Aim for The Best

Having said that, being free to make mistakes doesn't mean we should be sloppy with our work. Of course you have the freedom to be sloppy, but you're not doing yourself any favours by accepting mediocrity and giving yourself excuses to stay bad. If you've made a mistake before, learn from it and try to avoid it the next time. But don't expect to learn the lesson perfectly and avoid that same mistake completely the second time. Learning is a process. We get better. We don't get perfect.


Copyright Favian Ee  Apr 2012
Quick sketch, A6 size. Extra vertical line at top.
Copyright Favian Ee  May 2013
One year later and A5 size. Half an hour without colour


Learn to Cover Up

A lot of the time, you can actually cover up a mistake. I'm not talking about erasing. Sometimes that works. Sometimes that will make things worse (like damage your paper surface). Sometimes the medium won't allow it. But oftentimes, there are ways to hide your mistakes. Better yet, there are ways to use your mistakes to your advantage. The excitement of using certain media like watercolours, for example, is all about "happy mistakes". Not all that is unexpected is unexpectedly bad. If all else fails, just leave them there and move on. Tell yourself it was just practice anyway. Or tell your friends with a laugh that you were exploring a new style. Don't take yourself too seriously.

Copyright Favian Ee  Jun 2013
Sometimes you can convert an inking mistake by blackening that area.
Like make it a silhouette. Or a pair of shades.


Don't Be Too Hard On Yourself

Sometimes we're our own worst critic. Oftentimes, nobody knows you made a mistake. So you missed out some details or got the perspective or proportions wrong. When you show it to a friend, they probably won't notice because they weren't there. They don't know what the real thing looks like. If your mistakes are obvious to all, tell yourself this ain't gonna be your last drawing, and it certainly won't be your best. Then go out and draw some more! One lousy drawing isn't the end of the world. Truth be told, sometimes you won't know you've made a mistake yourself until sometime down the road, you look back at your old sketches and think to yourself, "Wow. I drew THAT??" 

Copyright Favian Ee 2013

Can you spot where I made the mistake? Probably not, cos YOU WEREN'T THERE!

How to Avoid Mistakes

If you're a perfectionist and still insist on avoiding making mistakes at all costs (though that's not likely going to happen if you're a beginner), there is one way to minimize doing so:

PRACTISE. PRACTISE. PRACTISE.

Be certain you'll make many mistakes along the way. But if you learn from them, you'll be making a lot less the more you sketch. So better get those mistakes out and done with so you can get to the better stuff.

Thursday, May 30, 2013

Sketchpacker Tools for Beginners - PAPER

I realise I haven't really posted much on tools for quite a while. If you're just starting off, you're probably wondering what materials you need and where you should start. Chances are you don't want to be spending loads of cash till you feel proficient enough. That's how I felt too, and I think everyone feels the same way. So I thought: Why not put up some posts to answer these questions on what kind of tools and materials a beginning sketchpacker can get, and what are some things to look out for?

I think a good place to start would be finding something to draw on, yes? We'll look at tools to draw with in future posts.

P A P E R

Unless you're thinking of bringing parchment and leather pieces around, or intend to draw on leaves and stones and scraps or in the sand, or on your digital tablet, you're going to need some PAPER. Assuming you're intending to keep your sketches, using a sketchbook may be the best option to keep all your sketches in one place. However, there may be times where you like a particular type of paper, but it doesn't come bound in a pad or sketchbook; or you may be just starting off and intending to use normal printing paper (although if printing paper is what you have in mind, it's still better to get a sketchbook). In these instances, bring along a folder. You don't want your sketches to get crushed and crumpled in your bag.

The first thing you need to know is Not All Paper Is The Same. Different kinds of paper will interact with different media for better or for worse. Use the wrong paper with the wrong medium and you may ruin your sketch from the start. So before deciding what paper you want to use, it would be helpful to know what medium you intend to sketch with. Do you want to use dry media like pencils, charcoal, or pastels? Or do you want to use wet media like watercolours and other kinds of paints? Or are you planning to use markers?

Paper for different media

For starters, there are some types of paper that can take a wide range of media reasonably well. One of my favourites at this point in time would be Daler Rowney's student ranges. They take ink, dry media, markers, and watercolour pretty well, and they're very affordable. If you're just starting off and are not sure what to get or what media you'll be using, these might be good sketchbooks to start with.


Left: Daler Rowney Simply A6 hardcover sketchbook
Right: Daler Rowney Graduate A5 softcover sketchbook

  1. http://www.daler-rowney.com/en/content/graduate-sketchbooks
  2. http://www.daler-rowney.com/en/content/simply-hardback-books


Dry Media

Dry media would include things like pencils, pens, charcoal, pastels, and crayons. Generally for a beginner, if these are the media you are planning to use, you won't have to worry too much about paper types. Most (if not all) papers will take dry media fairly well, though the paper's texture would give different effects. Paper with more "tooth" (grain) would give more texture to your drawing than paper that is smooth.

Another consideration for paper suitable for dry media such as pencils is erasability. The quality if your eraser is important, but so is the paper. Some kinds of paper are hard to get pencil marks off, even with a good eraser. For years I stuck with one brand of sketchbook that I could get from ordinary stationery stores and avoided other brands of the same range just because of erasability.

Wet Media

If you're planning to use wet media like watercolours, acrylics, gouache, poster colour, Chinese ink, or oils, you need to be more aware about what liquids do to paper. Some types of paper cannot take water well and will buckle (warp) badly when wet, or the surface might get rubbed off or damaged when wet and rubbed with a brush. If the paper buckles, you find your watercolours or paints pooling in the troughs. If that's the effect you want, fair enough, but if you're trying to get an even flat colour over a large area, that can cause quite a bit of frustration.

If you're planning to use watercolours, be sure to choose a paper that can take water. Some paper can stand up to light washes but not heavy washes, and too much water would degrade the paper's surface or cause it to buckle.

Your local art store should have a variety of papers for wet media. Hopefully the store assistant knows his/her products, and you can get some good advice ('cos I've met art store assistants who know nothing about their products).

Ink

The main thing you'll be concerned about when using ink is whether the ink will bleed on the paper you are using. Bleeding is what happens when your ink spreads away from the point of contact. It would take a bit of experimentation to know what kind of inks will bleed on what kinds of paper, because different inks use different solvents, and different papers interact differently with each kind of ink. Take the following sketch, for example, which I did using Pilot's Parallel pen:

Copyright © Favian Ee  2012


As you can see, the ink bled quite badly. But in another sketch using Hero ink (and watercolours) on the same paper, we don't find any bleeding:

Copyright © Favian Ee  2013
Some types of paper that are more absorbent will allow you to use watercolours over your ink if the ink is semi-water-resistant (such as Hero ink) when dry without much problems, while paper that isn't so absorbent where the ink just sits on the surface will cause big black messes when you put water over it - even after the ink has dried.

Markers

Typically there are 2 types of markers we commonly come across - water-based and solvent (usually alcohol) based. Examples of water-based markers would be magic markers (magic pens), while alcohol-based markers would include Copic, Marvy, Touch (by ShinHan) and the like. Solvent-basedmarkers will bleed like crazy on normal paper. Not only will they bleed outwards. They'll bleed right through, oftentimes onto the sheet(s) underneath. To avoid that, place a piece of unwanted card or board (cardboard, or better still, a plastic cellophane sheet) under the sheet you're working on. Or get proper marker paper. But that's going to cost you a bit more. Markers themselves aren't the cheapest media either.

Front
Copyright © Favian Ee  May 2013

Back. The markers have bled through.
Fortunately I placed a backing when working on this piece.


Acid-free paper

A lot of paper turns yellow over time. If it's not because you spilled your coffee on it, it's quite likely because the paper contains acid. This acid is naturally occurring in the wood used to make the paper. Besides causing discolouration, it can also degrade the paper and make it brittle over time. If you want your sketches to last, get paper that is acid-free. The inexpensive Daler Rowney sketchbooks I listed above are acid-free.

Texture and Colour

Texture and colour of paper may not be a big concern for complete beginners. But as soon as you are keen to experiment, you may be interested in considering using paper of different textures and colours to get different effects. Most watercolour paper is cold-pressed and textured (hot-pressed paper is smooth). You could get interesting effects using dry media on watercolour paper, or paper with coarser grain. If you are using dip pens and ink, rougher paper may not always be ideal, since the sharp tip will scratch the surface and the paper fibres may get stuck in the nib. Likewise rougher paper might be less kind on your marker tips and wear them out faster.

Coloured paper is best used with opaque media like pastels, chalk, acrylics, and gouache. Colours can range from off-white (or ivory) to black, and any hue and shade in-between. It would be quite a waste to use transparent watercolours on dark coloured paper for obvious reasons, but if that's your kinda thing, why not?


Some Final Tips

Hopefully you don't feel overwhelmed with information or intimidated. Yes, there's a whole load of paper to choose from, but ultimately the best paper for your sketchpacking trip is the paper you're most comfortable with. Unless you're intending to sell your drawings or hold an exhibition, who cares what paper you're using?! A friend of mine uses any local paper he can lay his hands on (even paper from children's exercise books!). Another friend doesn't even need paper. She sketches on leaves, wooden planks, concrete blocks, anything! Of course, it'll be very difficult (if not impossible) to carry those things around and store them properly while on holiday, but that's where a camera comes in handy.

If you're just starting out, just get some cheap sketchbooks and experiment. But you may want to do your experimenting before you leave for your trip, because if you're like me, you wouldn't want to find out that your paper (or materials) can't do some things you want just when you're beginning your sketch.

Sunday, May 5, 2013

Sketchpacking Penang 2013

Took quite a while to scan my sketchalogue (sketch journal + travelogue) but here are the pages I completed in Penang!

As you can see I like writing as much as I like drawing. That's probably why I always gravitated towards comics and animation. I'm quite a storyteller at heart.

Interesting thing about my sketching habits is I tend to utilize different materials and styles almost everytime I do a sketch (or everytime I'm out). It keeps things from getting boring, but actually there are other reasons for doing it. I choose my tools for several reasons:
  • The effect I want to get
  • The speed/ease at which I want to draw
  • Convenience (eg. how easy is it to take out of my bag, especially when I'm travelling with a full backpack)
  • What I want to bring out for the subject I'm sketching
  • Experimentation
Sticking stuff like tabs, receipts, plants/seeds, etc. in the sketchalogue also makes things a bit more interesting and helps remember interesting experiences. Some of my friends sketch on paper available locally. Some will paint with coffee and tea (not me, cos I'm afraid of ants eating up my sketchbook!).

Copyright © Favian Ee  May 2013

Sky Cafe, Sky Hotel (famous roast pork rice!)
Copyright © Favian Ee  May 2013

Chew Jetty
Copyright © Favian Ee  May 2013

Lighting of Khoo Kongsi
Copyright © Favian Ee  May 2013

Copyright © Favian Ee  May 2013

Copyright © Favian Ee  May 2013

Urban Sketchers, Penang
Copyright © Favian Ee  May 2013

Copyright © Favian Ee  May 2013

Copyright © Favian Ee  May 2013

Ecco Cafe
Copyright © Favian Ee  May 2013

Copyright © Favian Ee  May 2013

Tho Yuen Restaurant Dim Sum
Penang Botanical Gardens
Copyright © Favian Ee  May 2013

Kek Lok Si Temple
Copyright © Favian Ee  May 2013

2nd Generation Funicular Railway Car
Copyright © Favian Ee  May 2013

Copyright © Favian Ee  May 2013

Penang Hill - Gate House
Copyright © Favian Ee  May 2013

Toh Soon Cafe
Copyright © Favian Ee  May 2013

Teluk Bahang Dam
Copyright © Favian Ee  May 2013

Teluk Bahang
Copyright © Favian Ee  May 2013

Campbell Street Market
Copyright © Favian Ee  May 2013

Viper at the Snake Temple
Copyright © Favian Ee  May 2013

Saturday, May 4, 2013

Back to Penang!

Note: I wrote this blog post before I went to Penang last week, but didn't have time to post it till now (after I came back), hence the present and future tenses. Correcting the tenses would take too much effort and lose the effect, so I left them as they were.

------------------------------------------------------------

Last year I visited Penang for the Sketching George Town event organized by the Urban Sketchers Penang for the George Town Festival. I told myself then that I had to visit Penang again and go to the places I missed during that trip. Well, the time has come! I'm heading to Penang this weekend!

I packed a lot of gear last year and didn't use some of my materials at all (like my colour pencils). I also packed several sketch pads, since we needed to sketch on loose leafs that could be put on display for the event's exhibition. This year I'll be bringing less materials and will be using primarily my moleskine travel journal. This is what I'm packing this time for my day pack (I took out the markers at the last minute and left them at home).


You may have noticed I have 2 watercolour sets. The 2 white palettes are filled with ShinHan Professional Watercolours squeezed from tubes. They're really nice and intense, and I'm bringing them because I need to finish a couple more pieces with them. The other set is my smaller travel set. It's a Schmincke set with 12 colours. I added a few more Holbein colours squeezed from tubes, and one Rembrandt Cerulean Blue which I bought to try. Quite a few of the colours are opaque. Not my favourite, but I can't waste them. They didn't come cheap. (They can be useful though).

As you can see, I have a nice SLR. After much deliberation, I decided to take it along. But if you look closely, it's not a DSLR. It's a Canon EOS 300. It was my present from more than 10 years ago, and is the last generation of entry-level SLRs produced by Canon before they went digital with the 300D. I took this baby to Penang when I visited in 2001. Now I'm taking it back together with my trusty G12. I'm hoping it'll be fun. I miss printing photos from film and displaying them in albums. Hard copy albums are such communal and fun things. Digital albums might reach a wider audience, but it's not really that social - everybody just sees it on their own from their own PC or device. There's no real interaction with others viewing the pictures in the same place at the same time.

As for clothes, I like my clothes fresh, so I'm packing 5 sets of clothing for the 5 days I'll be there, 1 set of indoor wear, 1 set of sleep wear, and the set I'll be wearing there. I don't really pack light, but I'm not planning on washing my clothes there. It shouldn't exceed the carry-on luggage allowance though (actually it did, and I ended up purchasing extra baggage weight).

I'll post my sketches from the trip soon after I've scanned them.